Skip to content
Installing a LiftMaster MAXUM commercial door operator takes planning, the right setup, and careful attention to safety. These systems are built for commercial and industrial use, so installation should only be done by trained professionals.
Before installation begins, it is important to understand the door type, drum size, and sprocket size. These details help determine the right operator setup and help avoid delays on site.
The LiftMaster MAXUM line is designed to make installation easier than many older commercial door operators. Features like a lighter design, floor-level LCD display, Wi-Fi connectivity, and simpler setup steps help speed up the process while improving long-term performance.
If you are researching the LiftMaster MAXUM line before choosing a model, you can explore available options in our LiftMaster MAXUM collection and compare them with other commercial door operators.
Start with Planning and Site Preparation
A successful installation starts before the operator is mounted.
First, confirm the door type, drum size, and door sprocket size. LiftMaster notes that door sprockets are no longer included with the operator, so this should be checked ahead of time. You should also review the manual to confirm the recommended configuration for the site.
Before arriving for installation, make sure the site is ready. This includes:
-
Power wiring already installed
-
Separate conduit for power and data wiring
-
A rigid mounting surface
-
A working network connection for Wi-Fi setup and firmware updates
If the operator will connect to myQ Facility, it is also important to get the Wi-Fi network name and password from the facility’s IT team before work begins.

Inspect the Door Before Mounting the Operator
Before mounting the LiftMaster MAXUM operator, inspect the door itself.
Check that the door moves correctly under tension. A poorly balanced or improperly tensioned door can prevent the operator from working as expected. Remove ropes connected to the door and disable any locks.
Next, inspect the mounting area. The mounting surface must be strong enough to support the operator securely. The operator drive shaft must also stay parallel to the door shaft for proper performance.
This step is especially important for commercial and industrial doors that see frequent daily use.
Understand the Difference Between JDC and JHDC Models
The MAXUM installation process can vary slightly depending on the model.
In the LiftMaster installation video, the demonstration covers both:
-
JDC models, also called jackshaft operators
-
JHDC models, also called hoist operators
JHDC hoist operators include a hoist chain assembly for manual operation during a power outage. JDC jackshaft models do not include a hoist assembly, but they come with a battery kit for backup operation.
Both models are dual-handed, which means they can be installed on either the left or right side of the door. This gives installers more flexibility on site.
Mount the Operator and Install the Drive Chain
Once the site is ready, the operator can be mounted.
The correct mounting position is important. The operator drive shaft should usually sit about 12 to 15 inches below the door shaft, with the shafts aligned correctly. After securing the operator to the wall, the drive chain is wrapped around the door sprocket and drive sprocket.
At this stage, installers determine how many chain links to remove so the chain has a small amount of slack. Then the chain is connected with the master link, and the operator position is adjusted to remove excess slack before all mounting hardware is tightened.
For hoist models, the hoist chain is installed after the operator is mounted.
Complete Power Wiring and Wall Controller Setup
Before wiring begins, power must be disconnected at the circuit breaker.
The LiftMaster MAXUM operator supports different voltage setups, so installers need to connect the correct power selection wire harness for the application. In the demo video, the example uses 120-volt single-phase power.
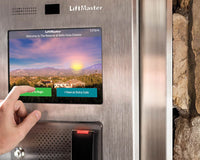
The wall controller is another key part of the setup. MAXUM uses a floor-level wall controller with an LCD display, which gives access to programming menus and system information. It should be mounted within sight of the door, away from moving parts, and at the required height.
This controller helps make setup and future service easier than with many older commercial door operators.
Install the Monitored Safety Devices
LiftMaster MAXUM operators include monitored entrapment protection devices.
These safety devices must be installed and wired correctly before the operator can be fully commissioned. In the video, the transmitter and receiver are mounted either on the wall or near the floor, based on the application. Their wiring must be routed through separate conduit, not through the same conduit used for power.
Once connected, the devices need to be aligned correctly. When the sensors are aligned, the indicator lights stay solid. If the lights blink, the devices must be adjusted.
This step is critical for safe operation.
Program Limits, Wi-Fi, and Quick Start Settings
After wiring is complete and power is restored, the operator moves into commissioning.
The wall controller displays a quick start menu that guides the installer through the setup. This includes:
-
Selecting the door type
-
Choosing the drum size
-
Setting speed and tooth count
-
Setting the open limit
-
Setting the closed limit
After that, the operator can be connected to Wi-Fi. This is an important part of MAXUM installation because Wi-Fi allows over-the-air updates and connection to myQ Facility.
Using a mobile device, the installer connects to the operator, opens the setup page, selects the facility network, and enters the password. Once connected, the LCD display shows signal strength.
This connected setup is one reason newer systems like MAXUM stand out. If you want to understand the bigger role of connected access tools, our article on myQ integrations and building a security perimeter in multi-tenant properties is a helpful next read.
Final Checks After Installation
Once setup is complete, installers should test the full system.
This includes checking door travel, confirming open and close limits, verifying the safety devices, and reviewing operating modes. Features like timer-to-close and mid-stop can also be adjusted through the programming menu if needed.
If a battery kit is included or added, it should also be installed and tested.
These final checks help make sure the LiftMaster MAXUM operator is ready for daily use and long-term performance.
Why Proper Installation Matters
A LiftMaster MAXUM operator includes advanced features like Wi-Fi, floor-level controls, smart commissioning, and support for myQ Facility. To get the full benefit of these features, the system needs to be installed correctly from the start.
Good installation helps reduce downtime, improve safety, and make future maintenance easier. It also helps facilities get better visibility and control over their commercial door operators.
For teams comparing connected entry and access systems beyond the door itself, our guide on telephone entry systems vs. video intercom systems also shows how different access technologies support smarter facility management.
Frequently Asked Questions
Can I install a LiftMaster MAXUM operator myself?
No. LiftMaster MAXUM operators are designed for commercial use and should only be installed by trained professionals.
What do I need before installation starts?
You should know the door type, drum size, sprocket size, power requirements, and Wi-Fi details for the facility.
Does LiftMaster MAXUM support myQ Facility?
Yes. A working network connection is needed for setup, firmware updates, and connection to myQ Facility.
What is the difference between JDC and JHDC models?
JDC models are jackshaft operators with a battery kit. JHDC models are hoist operators with a hoist chain assembly.